Let's be honest: diving in to a new technology stack can be quite cumbersome. In order to get your development environment ready, you have to install lots of tools like compilers, databases, gateways and other helping services. Switching between different technologies, your system may need to accomodate an ever-growing list of locally installed software. Most of that software runs in background, slowing down your system and utilizing resources you would rather use while focusing on your actual project. In the case of moving to new hardware, things get worse. You will have to spend a considerable amount of time re-installing and re-configuring your tools until you're able to work as efficient as before.
Visual Studio Dev Containers to the rescue

Simply install this extension for Visual Studio Code and all your dreams (well at least some) may become true. It allows you to use a Docker container as a fully-featured development environment by allowing you to open any folder of your local machine mounted into a container while taking advantage of all features Visual Studio Code has to offer.
You simply supply a custom devcontainer.json file in your project to instruct VSCode on how to create and access the development container you need for your project. It uses an open specification, that is available at containers.dev. Of course, there are some requirements for this to work, but they are mostly requirements for running Docker on your operating system. Head over to the plugin's documentation and have a look at the system requirements.
One cool thing is that Microsoft offers a curated list of pre-configured development containers that may already suit your needs.
This blog uses Nuxt 3, which relies on node.js and uses TypeScript. I can now use VSCode to open an existing project folder inside a new development container in the following way:
- Press
Ctrl + Shift + P(on Windows) to open the command palette - Type
Dev Containers: Open Folder in Containerand press Enter - Select your project folder
- VSCode now prompts you to select a dev container template to start with (I chose
Node.js & TypeScript)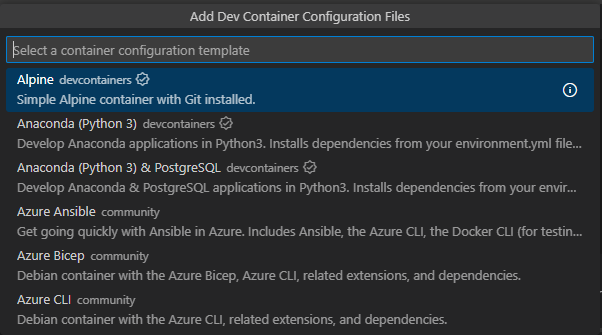
- It then allows you to choose the version you want (I chose
16-bullseye) - After that, you can tick tools you want to get installed to your container (I skipped this part)
If everything went well, VSCode now starts a new dev container with your selected configuration. This settings get persisted to the now created devcontainer.json inside the .devcontainer folder.
This file is pretty simple:
{
    "name": "Node.js & TypeScript",
    "image": "mcr.microsoft.com/devcontainers/typescript-node:16-bullseye",

    // --snip--

    // Use 'postCreateCommand' to run commands after the container is created.
    "postCreateCommand": "npm install"

    // --snip--
}
The only thing I did was to uncomment the "postCreateCommand" option and set it to npm install so that the dependencies I need to run my blog in dev-mode get installed when generating the new dev container.
After that, open the terminal inside VSCode and you have a shell running inside your container, starting with your project directory as your current working directory. All the tools you need are installed inside your dev container and will never clutter your host system again.
Like what you are reading?